
Before you start reading this blog post, you might want to first Download the Free Content Calendar Template and Guide -- it'll help you start implementing the steps below right away! :)
What is a Content Calendar?
In simplest terms, a content calendar is a document that specifies when you’re going to publish what.
This can include planning the publishing dates of:
- Social media posts
- Blog posts
- Email newsletters
- Courses
- Anything you’re putting out there as part of your content marketing mix!
Why Should You Plan Your Content Calendar?
Sure, technically you could wing it -- post on social media willy-nilly, write a blog post next time you’re inspired, and send an email blast once you realize you haven’t sent one in ages.
This approach, while seemingly more chill than actually being a person who plans things in advance -- will result in a less chill experience, and more than likely, less effective marketing efforts.
This laissez-faire approach will results in a less chill experience because you will constantly have that nagging voice in your head (unless you’re already super zen and immune to these nagging voices, in which case -- I’m happy for you!) saying that you should be posting something, writing something, emailing something.
Having a content calendar in your back pocket (or your Google Drive, as it were) will give you the peace of mind that all your pieces of content will be published consistently, and your content marketing machine will be running smoothly.
Peace of mind and better marketing results: what more could you want?!
When Should You Plan Your Content Calendar?
Planning your content calendar is the first step of an effective monthly content marketing management process.
By this point, you've gone through the preliminary and foundational step of defining a marketing strategy that will attract and convert your target audience. This strategy can and should be tweaked over time as you see what works and what doesn't.
Part of developing your content marketing strategy involves answering the question, "what kind of content will resonate with my ideal customers and position my brand as an expert in our field?"
For example, if you’re a dermatologist, a few of your “content categories” could be:
- Skincare Myths vs Facts
- Everything You Want to Know About [X Cosmetic Treatment]
- Ask a Derm: Top Questions from Our Patients
- X Reasons to Attend Our Next Event
- Holiday-Related Content
Once you have these overarching content categories, the next step is to figure out when to post about what -- this is where the content calendar comes into play.
- When: Once you’ve figured out how often you want to publish different types of content (i.e. 7 social media posts per week, 4 blog posts per month, 2 email newsletters per month) then it’s time to fit these frequency goals into actual publishing dates.
- What: You might also have specific goals on how often you want to publish content relating to each of your content categories. The number of holidays that relate to your brand will also vary from month to month, affecting the question of what content to publish.
There’s no strictly defined rule on when exactly to plan your content calendar.
If you really want to get ahead of the game, you can plan a whole year in advance! You can get more specific with dates as you get closer to the present, and add in future content publishing goals to the extent they can be planned.
You can add in known dates such as holidays as placeholders, as well as any defined dates relating to your brand’s own milestones, such as events and product launches.
The time required for content creation is a key consideration in determining the extent to which you want to plan in advance. If you’re creating all your content and this content is low in complexity, you will need less lead time than if you’re planning to publish more involved content -- particularly if this content is being created by someone else and you need to bake in deadlines for approvals.
Now that we’ve covered what a content calendar is and when to create one -- let’s get into the steps to planning your calendar!

Step 1: SET UP Your Content Calendar Template
Before filling out your content calendar, naturally, you will need a content calendar to fill out!
This is largely a one-time step, since making the next month’s calendar will involve duplicating your first calendar template and replacing the content to reflect the new month.
I like building content calendar templates in Google Sheets -- the company's spreadsheet product.
You can build yours in Excel if you prefer, or even in a physical calendar you purchased at a bookstore (if you’re old school like that!)
I like Google Sheets because it makes your content calendar:
Always up-to-date
Safe in the cloud
Easy to share with others
Exactly how you format your calendar is up to you. I used to build mine to resemble a classic calendar, but since I’ve moved to a more straightforward table format -- organized by week.
The screenshot below shows you a hypothetical week in a dermatologist’s content calendar, to continue with the example given above:
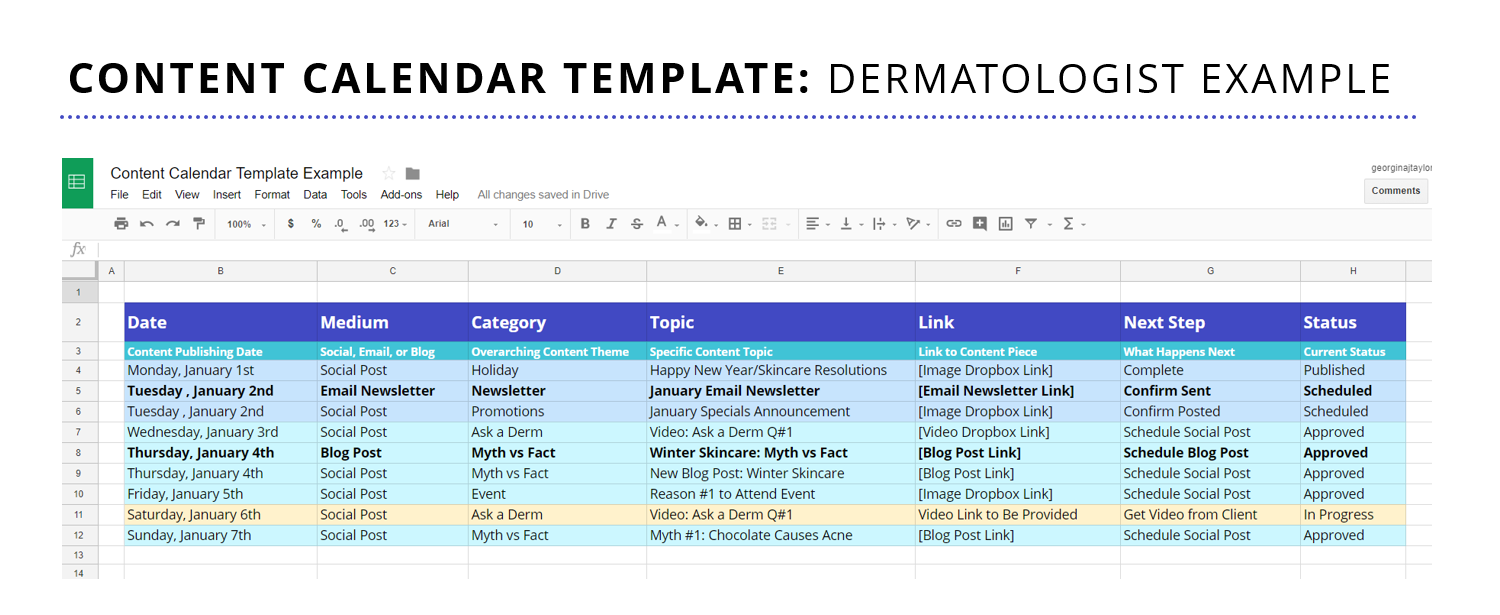
Each row represents a content piece, be it a social media post, blog post, email newsletter, etc.
Below are the columns you can add to your content calendar, depending on your specific needs and preferences:
Date: You couldn’t call it a calendar without a list of dates! Add these in the leftmost column of your spreadsheet. You might want to have one column for publishing date and another for due date, particularly if someone else is creating content for you and you want them to provide content with a certain amount of lead time.
Content Medium: Does this row represent a social media post, blog post, email newsletter? If you plan to, say, publish a blog post then send out a social media post and an email newsletter announcing the new blog post -- this would represent three rows in the calendar, each corresponding to the message that would be published across each platform. If you want to get more granular, each social network can be its own medium and get its own row.
Content Category: If you want to keep track of the overarching category behind each piece, you would do so in this column. For example, "myth vs. fact", ask the expert, event promotion, holiday, etc. This is useful so that down the line you can match up the metrics on how well each content piece did with its overarching category -- revealing trends in terms of what types of content resonated with your audience.
Content Topic: Here is where you would list out the specific topic of each content piece -- for example, “myth vs. fact: does chocolate give you acne?”
Content Link: Here you could link to a Dropbox file (in the case of original content, i.e. a branded graphic or video) or a third-party URL (in the case of curated content, where you’re sharing something that someone else has created). Adding this here allows you to quickly find the “meat” of whatever content piece you’ll be sharing. This is particularly useful if more than one person will be accessing the calendar -- it allows you to link out to all the content requiring approval straight from the calendar. It’s also helpful for when you want to go back and find a specific piece of content, you can simply search for it within your calendar file.
Next Step: Exactly what it sounds like! What needs to be done next for this content piece? For example: “create social media graphic”, “write blog post”, or “approve email newsletter”.
Status: A simplified version of the next step column, this column simply would specify “published”, “scheduled”, “approved”, “in progress”, or “to be started”. You could also color code each row based on status for an at-a-glance view of where your content production efforts stand at any given time.
That may sound like a lot, but once you’ve created the template -- making the next month’s calendar is simply a matter of duplicating your calendar tab (or the whole file) and updating the information contained therein.
I promise: the peace of mind and sense of organization that a content calendar will give you is well worth it!

Step 2: Add Brand-Relevant Holidays
Now that you have your content calendar template, it’s time to fill it up with your content plan.
This doesn’t necessarily have to be the next step in filling out your calendar, but I think it’s a good one because it crushes writer’s block.
Instead of staring at a blank calendar, starting your planning process with a few dates in place can get your creative juices flowing as you figure out what content you want to create all month.
A holiday can represent a single social media post wishing people a happy whatever-it-is day, or it can become a full blown advertising campaign, blog post, etc. that would exist over several days.
Go through this uber-list of social media holidays with this step in mind and figure out the ones that pertain to your brand.
General holidays that a large part of the population will celebrate and specific holidays that relate to your brand can both be great for inclusion in your calendar.
Relating this to the dermatologist example, some brand-relevant January holidays could include:
January 1st - New Year’s Day: Can be tied to messaging about New Year’s resolutions for taking care of your skin
January 15th - Hat Day: Can be tied to the fact that wearing a hat is important for protecting your skin from the sun.
January 18th - Get to Know Your Customers Day: Can be tied to asking customers a question about their skincare habits, doubts, etc.
January 20th - Cheese Lover’s Day: Can be tied to addressing the common “cheese gives you acne” myth.
January 26th - Fun at Work Day: Can be posted about with a “behind the scenes” photo of the people that work at your office having fun together!
Step 3: Make a List of Upcoming Brand Milestones
After you have made note of the upcoming holidays in your calendar, it’s time to add in your company’s upcoming milestones that you want to create content about.
This can include things like:
Company events
Brand-related events (i.e. conferences)
Product launches
New features
Press features
Together with holidays, these brand milestones will form the core of “what’s coming up and newsworthy” so that you can proceed to the following steps.
Step 4: Decide on Your Macro-Content Topics
Once you have your list of important dates in place, based on steps 2 and 3, it’s time to come up with topics for your “macro-content”.
What exactly is macro-content?
It’s basically a larger, more involved content piece that lives on your website (in the case of blog posts and courses) or in your customer’s email inbox (in the case of newsletters or ebooks, for instance).
In the latter case, your audience has given you permission to enter their email inbox with your content. They may have opted into your lead magnet (i.e. a freebie that people can get in exchange for their email address, like an ebook) or signed up for your newsletter.
The goal of macro-content is to be informative, a resource that tells people all they need to know about a certain topic. Like this blog post! The assumption is that you already have someone’s attention, because they clicked on your email subject line or blog headline, or entered their email address for a free download -- and they are interested in reading more about what you have to say.
These content pieces are more involved, and can be broken into multiple pieces of “micro-content”. For example, each image that breaks up the sections of a blog post could be its own social media post that links back to the related blog post.
In this way, every piece of macro-content can consist of multiple pieces of micro-content that you would use on social media.
In the case of our dermatologist example, you could have a blog post (macro-content) called “5 Myths About Skincare” and break that post into 6 different social media posts (micro-content) that all link back to the blog post:
5 Myths About Skincare: Your first time posting about a blog post, you can use the main image and focus the messaging on the fact that you have written a new blog post.
Myth #1 - Chocolate Gives You Acne: Your second post in this series would focus on the first section of the blog post, and include an image relating to this section that is also used to separate this part of the blog post.
Myth #2 - Cheese Gives You Acne: Another blog post section that becomes a social media post.
Myth #3 - You Will Age Like Your Mother: And another.
Myth #4 - You Don’t Need to Wear Sunscreen in Winter: Noticing a trend?
Myth #5 - You Can Prevent Wrinkles Through Face Yoga: The final micro-content piece tied to your macro-content piece in this example. Since these are not time-sensitive you can also re-post them in the future, because not everyone will see your post the first time!
Once you’ve figured out the topics of your macro-content -- which can be based on holidays, events, or one of the content categories you’ve defined in your strategy (i.e Myths vs Facts) -- you would define how many pieces of micro-content (social media posts) would relate to that piece.
Step 5: Define Your Micro-Content Topics
Micro-content is created with short attention spans in mind, because it lives on social media.
Here is where you would want to create eye-catching images or videos and intriguing copy that gets people to want to click and learn more.
The goal is to interrupt their social media newsfeed browsing with a post that’s a real scroll-stopper!
You would look at the publishing dates of your macro-content, holidays, and company events to determine which days will have a social media post (micro-content piece) attached.
Once you’ve done this, you’ll see if there are gaps in your calendar or if you have too many micro-content pieces for social media, in which case you can move some of the non-time-sensitive posts (like the Myth posts in the example above, which don’t tie to specific holidays or brand events) to the next month’s calendar.
If there aren’t enough micro-content pieces to fill out your social media schedule, you can come up with additional ideas based on your content categories or take a closer look at the holiday list for dates that could be related to your brand with a bit more creativity.
This is also the stage at which you'd fill any social media content gaps with third-party content that you've curated from other sources. For help with that step, check out this guide to my 6 favorite tools for curating content.
Step 6: Share Calendar with Any Stakeholders
If you’re collaborating with other people on the content production process, this is the point when you would share it with them to get any necessary approvals or feedback.
Step 7: Create and Publish Content per the Calendar
Now that your calendar is finished, it’s time to use it!
The “next steps” and “status” columns will help you and your team stay focused on content production priorities, giving everyone a clear idea of the status of your marketing efforts.
